"We could not verify your identity" is the entire message some readers get after their first attempt, with no further detail about which part failed. It is one of the more frustrating screens in the whole signup process, mostly because the underlying reason is almost always something small and fixable — a corner of the ID cropped out of frame, a selfie taken in a dim room, a name typed slightly differently than it appears on the card. This guide pulls together the common rejection reasons, matches each one to a fix, and lays out exactly which document to use depending on where you are verifying from.
This is the companion piece to our full account setup guide, which covers registration end to end; this page covers only the identity-verification step.
Nothing about this process is unusually strict compared with other regulated exchanges. The friction readers actually run into is almost never the requirement itself; it is a photo taken in bad light, a name typed slightly differently than the document shows, or a document type that is not on the accepted list for a given country. Most of those have a straightforward fix once you know what the system is actually checking for — which is the entire point of this guide — though fixing one means resubmitting and waiting out another review rather than clearing it on the spot.
Rules that apply everywhere
Before the country-specific detail, a handful of rules hold regardless of which document you are using or where you are verifying from.
- The document must be current. An expired ID or passport is rejected automatically in most cases, regardless of how good the photo is.
- The name you registered with should match the document exactly. A shortened name, a missing middle name, or a spelling difference between what you typed at signup and what is printed on the card is one of the most common causes of a manual review flag.
- The photo must show the whole document, uncropped, with all four corners visible. A photo that cuts off an edge to "zoom in" on the text usually fails, since the automated check needs the full card shape to validate against.
- Screenshots of a document, or photos of a photo, are not accepted. The system checks for signs of a photo taken directly of a screen or a printed copy, both of which typically fail.
- One person, one verified identity. Attempting to verify a second account with the same document, or verifying with someone else's ID, breaks Binance's terms and can result in both accounts being restricted.
A first rejection is not the end: fix what the message names and resubmit.
Which document works in your country
Binance sets its accepted document list per country, selected at the start of the verification flow, and the options differ enough between the three markets this table covers that it is worth checking your row specifically rather than assuming they all match.
| Country | Primary document | Alternative | Notes |
|---|---|---|---|
| Pakistan | CNIC (Computerized National Identity Card) | Passport | CNIC is the faster route for most readers since it is the document already on hand; a passport works equally well if you have one |
| Kenya | National ID | Passport | Kenya's newer National ID format scans cleanly; older, heavily worn cards sometimes need a passport as a backup if the ID photo keeps failing |
| India | Passport | Driving licence | Which documents India-based users can submit is shown on the verification page for India |
If your country is not one of these three, the same general principles in this guide still apply — the interface lets you select your country and shows the specific documents accepted for it before you upload anything.
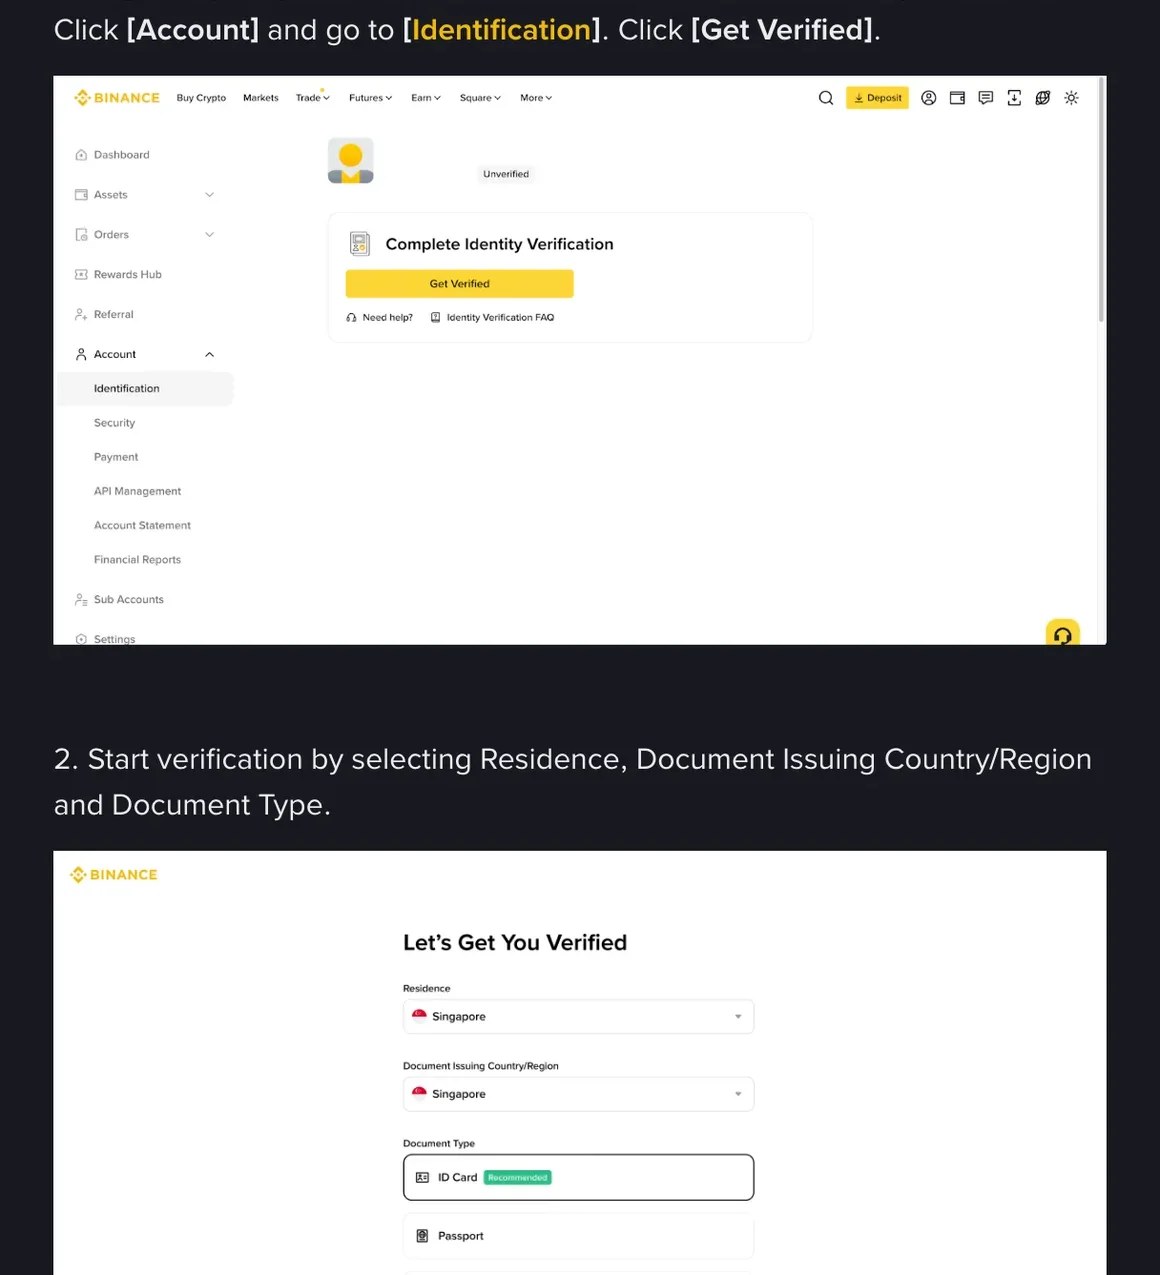
Getting the country fields right at the very start matters more than it might seem, and the part that confuses people is that there are two of them rather than one. The verification flow asks separately for your residence — the country you actually live in — and for the issuing country or region of the document you are about to upload, before you then pick the document type itself. They are two different questions and they do not have to give the same answer: if you live in Kenya and hold a Pakistani passport, residence is Kenya and the issuing country is Pakistan.
Neither field is a menu to choose strategically from. Residence has to be truthful — selecting somewhere you are not actually resident is precisely the kind of mismatch the checks exist to catch, and it can cost you the account rather than just the attempt. The issuing country has to be whoever issued the card or passport in your hand, since that is what determines which document types the app offers you on the next screen. Picking a country because it looked more familiar in the list, or because you assumed the two fields were the same thing, is a common route to a rejection that has nothing to do with the quality of your photos.
Photographing your document
The document photo fails far more often than it needs to, almost always for one of a small set of avoidable reasons.
Find flat, even light
Daylight near a window works better than an overhead bulb, which tends to cast a hotspot of glare across a laminated card.
Lay the document on a plain, dark surface
A table or floor in a solid color gives the automated edge-detection a clean boundary to find; a busy patterned surface or a similarly light-colored background can confuse it.
Fill the frame without cropping the edges
Get close enough that the text is legible, but leave a small margin around all four corners of the card.
Hold the phone flat and parallel to the document
A photo taken at an angle stretches the card's proportions and can distort text near the edges, which sometimes fails the automated read.
Check the photo before submitting
Zoom in on the preview and confirm every number and letter is sharp and readable — if anything looks blurry, retake it rather than submitting and hoping.
Both sides of the document usually need their own photo where a card has information on the back — the CNIC and the Kenyan National ID both carry meaningful printed detail on the reverse side, and skipping that second photo is a common reason a submission comes back incomplete rather than approved. A passport is the exception, since only the photo page is typically required.
| Do | Don't |
|---|---|
| Photograph in daylight or bright, even indoor light | Use flash directly on a laminated card, which almost always creates a glare spot |
| Lay the document flat on a plain surface | Hold it up in your hand, which introduces angle and shake |
| Leave a small margin around all four edges | Crop tightly to "zoom in," which cuts off corners the system needs |
| Check the preview before confirming | Submit the first shot without reviewing it for blur or glare |
The liveness check: why it fails and how to pass it
After the document photo, Binance runs a short liveness check — usually a brief video where you center your face in an outline and follow a prompt, such as turning your head slowly or blinking. This step confirms the person submitting the document is the same person shown on it, and that it is a live person rather than a photo or a video being played back.
This exists specifically to counter a known fraud pattern where someone attempts to verify an account using a stolen or purchased document photo without the actual document holder present — holding a printed photo up to the camera, or playing a video of someone else's face, both fail this check by design, which is exactly why the system asks for movement rather than a single static image.
| Common failure reason | Fix |
|---|---|
| Dim or uneven lighting | Move to a well-lit room or near a window; avoid backlighting from behind you, which puts your face in shadow |
| Glasses, a cap, or a face covering | Remove all three for the check itself, even if you normally wear glasses day to day |
| Moving too fast during the prompt | Follow the on-screen instruction slowly and hold each position briefly rather than snapping through it |
| Face partly out of frame | Hold the phone at eye level, arm's length away, with your whole face inside the outline shown on screen |
| Unstable connection during upload | Switch to Wi-Fi or a stronger signal area before starting the check, since a dropped upload partway through often shows as a generic failure |
None of these fixes require special equipment — a phone's front camera in reasonable daylight is enough. If it fails twice in a row for no clear reason, closing and reopening the app before a third attempt sometimes clears a stuck session that a simple retry does not, which is a different fix from any of the lighting or framing issues above and worth trying specifically when nothing about the setup seems to be the problem.
How long review actually takes
The number to plan around is Binance's own: submitted documents are usually reviewed within 48 hours, and it may take longer in particular cases. That is the commitment on their side, and it is what you should budget for if anything depends on the account being verified by a certain day. Binance does not publish a faster typical time. A submission that clears the automated check on its own can come back well before that, while one that has to wait for a human reviewer takes longer; treat a quick result as a bonus rather than something owed to you, and any guide quoting an exact number of minutes is guessing.
A few factors that tend to push a review toward the slower end of that range: a name that does not exactly match between signup and document, a document format the system sees less often, unusually high verification volume across the platform at that hour, and photos that are technically acceptable but not sharp. None of these mean anything has gone wrong — they simply move your submission into a queue a person looks at rather than a queue a system clears instantly.
| Status shown in app | What it means |
|---|---|
| Pending / In review | Submission received and in queue, either automated or manual — no action needed from you yet |
| Approved | Identity verification complete; P2P and standard limits unlock |
| Rejected | A specific reason is shown; see the next section for how to fix and resubmit |
| Additional information requested | Usually a request for a clearer photo or a second document rather than a full rejection — respond to the specific request rather than resubmitting everything from scratch |
If you are rejected: what to do next
A rejection is not the end of the road; the usual next step is to fix the specific problem it names and submit again.
Read the specific rejection reason shown in the app
It usually names the actual problem — blurry photo, mismatched name, expired document — rather than a generic failure.
Fix that one thing specifically
Retake the photo with better lighting, correct the name field, or find your passport if your national ID card keeps failing — whichever the message pointed to.
Resubmit once you have actually changed something
Resubmitting the identical photo hoping for a different result rarely works and can push the account toward a longer manual review after repeated attempts.
If it still fails after a genuine second attempt, contact support
At that point a person reviewing the specific submission is more useful than another automated retry.
If Binance verification genuinely will not clear for your situation after a fair attempt, our KYC rejected guide covers what a second exchange option looks like, including how the document requirements compare.
A pattern worth calling out specifically because it causes so many repeat rejections: submitting a slightly different photo each time without reading what the previous rejection actually said. If the message pointed to glare on the card, a second attempt with a different crop but the same lighting setup will likely fail the same way. Read the specific wording of the rejection and address exactly that word — glare, blur, mismatch, expired — before resubmitting.
Common name-matching issues across scripts
A category of rejection that deserves its own explanation: names that transliterate differently between a local script and the Roman-script line printed on an ID. This shows up often enough across Urdu and other scripts used in these markets that it is worth naming directly rather than folding it into the general rules above.
- Spelling variants. A name that can be romanized more than one way — extra or missing letters, "Mohammad" versus "Muhammad," for instance — should be entered exactly as printed in the Roman-script line on the document, not however you would normally spell it casually.
- Word order and spacing. Some documents print a given name and family name in an order or spacing that differs from how you might type it at signup; matching the document's exact printed order avoids an unnecessary mismatch flag.
- Initials versus full names. A document showing a full middle name where you typed only an initial (or the reverse) is a frequent, easily overlooked mismatch — check this specifically if a rejection cites a "name mismatch" with no further detail.
None of these issues reflect anything wrong with your document — they are simply a mismatch between two text fields that an automated system compares literally. Correcting the name field to match the document precisely, rather than assuming "close enough" will pass, is the fix for this kind of rejection.
Advanced verification and proof of address
Basic identity verification — the document photo and liveness check covered above — is what most readers of this guide need and is enough to unlock P2P trading and a reasonable set of limits. A smaller number of accounts, usually ones requesting higher deposit or withdrawal limits, are asked for an additional tier sometimes called advanced verification, which can include a proof of address.
Proof of address is typically a recent utility bill, bank statement, or official government letter showing your name and current address, usually needing to be dated within the last few months. It is a separate document from your identity ID and serves a different purpose — confirming where you live, not who you are.
| Basic verification | Advanced verification | |
|---|---|---|
| What it needs | Photo ID + liveness check | Everything in basic, plus proof of address and sometimes additional document detail |
| What it unlocks | P2P trading, standard deposit and withdrawal limits | Higher deposit and withdrawal limits than basic alone |
| Who typically needs it | Most readers of this guide | Accounts moving noticeably larger volumes than a typical first-time user |
| Where to check current limits | Binance's own verification page, since exact limit figures are adjusted from time to time and are best confirmed live rather than quoted from any guide | |
If a proof-of-address document is requested, the same basic rules from earlier in this guide apply: a clear, uncropped photo or scan, current within the last few months, showing your name and address matching your account details. A bill or statement with a mismatched or outdated address is rejected for the same reason an outdated ID is — the system cannot confirm it reflects your situation right now.
Binance's own verification tiers and current requirements are worth checking directly at the source, since they are the ones who can change what a given tier requires: see the Binance Support Center for the current identity verification FAQ.
Country-specific notes
Pakistan
The CNIC's chip-enabled newer format tends to scan more reliably than an older, more worn card. If your CNIC has visible wear on the corners or lamination that has started to peel, a passport photo often clears faster than repeatedly retrying a damaged card. Name matching also deserves attention here: Urdu-to-English name transliteration is not always consistent between how a name is written on a CNIC and how it might be typed casually at signup, so it is worth entering it exactly as it appears in the Roman-script line on the card.
One additional detail specific to Pakistan: the CNIC carries printed details on the back too, so photograph both sides.
Bangladesh
Binance P2P with bKash carries legal risks specific to Bangladesh; read bKash and Binance P2P: Rules and Risks before you verify.
Kenya
Older, worn ID cards are harder for automated checks to read; if a National ID fails twice with good photos, try your passport.
Kenyan National ID cards use a relatively small font for the ID number compared with some other documents in this guide, which makes photo sharpness particularly important — a photo that looks fine at a glance on a phone screen can still be too blurry at the pixel level for the automated number read to succeed, so it is worth zooming into the preview specifically on the ID number before submitting.
India
Which documents India-based users can submit is shown on the verification page for India, once you pick India as the issuing country. Check that list before you start: if you hold none of the documents it names, you will need to get one first, since neither the identity check nor P2P opens up without it.
If you are submitting a driving licence, make sure the version photographed is current and not an expired renewal still in your wallet from a previous cycle — expired documents are one of the more common single-line rejection reasons across every country in this guide, India included.
A short checklist before you submit
- Document is current, not expired, and matches the issuing country you selected in the app — with your residence entered as the country you actually live in.
- Name entered at signup matches the Roman-script name on the document exactly.
- Both sides of the document photographed, where the document has information printed on the back.
- Photo taken in even daylight, on a plain dark surface, with all four corners visible.
- Liveness check attempted in good light, glasses and face coverings removed, following the prompt slowly.
- Preview checked and zoomed in before final submission, not just glanced at.
Whichever document you are using, the underlying goal of every rule on this page is the same: give the automated system, and if needed a human reviewer, a document photo and a face that clearly and unambiguously match. Nothing about identity verification is designed to be difficult on purpose — most of what reads as friction is really just the gap between how careful the check needs to be and how quickly a phone photo gets taken. Two or three minutes checking the photo prevents most rejections.
Once verification clears, it does not need repeating for routine use — it is a one-time step per account rather than something you redo each time you deposit or trade. The only time it resurfaces is if you are asked for the advanced tier later, or if a document you submitted expires and Binance requests a refreshed one, which is uncommon for most accounts moving ordinary volumes. From there, our P2P guide is the natural next step, since identity verification is what unlocks that marketplace in the first place.
Binance KYC documents: IDs, liveness and review time
Which documents does Binance accept for KYC?
It depends on your country. A CNIC or passport works in Pakistan and a National ID or passport in Kenya; which documents India-based users can submit is shown on the verification page for India. The list you are offered follows the document issuing country you select at the start of verification, which is a separate field from your country of residence.
Why did my liveness check fail?
The most common reasons are poor lighting, a face partly out of frame, glasses or a face covering, or moving too quickly during the head-turn or blink prompt. Retrying in daylight near a window, holding the phone steady at eye level, and following the on-screen prompt slowly usually resolves it.
How long does Binance KYC take?
Binance's own wording is that submitted documents are usually reviewed within 48 hours, and that it may take longer in particular cases, so that is the figure to plan around. Some submissions come back sooner, but Binance does not promise a faster time, and a review can run longer when a document needs a manual check, which is more likely during busy periods or if there is a small mismatch an automated check cannot resolve on its own.
What is proof of address and when do I need it?
Proof of address is a separate, higher tier of verification some accounts are asked for to unlock larger limits, usually a recent utility bill or bank statement showing your name and address. Basic identity verification with a photo ID does not require it, and most readers of this guide never need to submit one.
Can I retry KYC after a rejection?
Yes. What matters is fixing the specific reason given for the first rejection rather than resubmitting the same photo. Repeated rejections without changing anything can occasionally trigger a longer manual review, so it is worth reading the rejection reason carefully before trying again.